API modelling
Introduction
REST APIs are commonly used to expose functionality provided by a service to external consumers. When doing this, it is good practice that the offered REST API is described by an OpenAPI specification, which allows consumers to easily browse the offered functionality.
API Modelling
To ease the creation of REST APIs within a service project, IBM DevOps Solution Workbench offers the API Modelling extension. It provides various modelling capabilities within the Solution Designer UI, which helps to quickly model REST APIs for various use cases.
The extension is available for the following stacks:
- Java Spring Boot Stack 2.0.0 and later
- NodeJS TypeScript Stack (only for Domain services and always enabled)
For the modelled REST API, a specification will be generated automatically in the OpenAPI 3 format. Besides that, it offers the capability to additionally build it in the Swagger 2 format. During deployment, the specification will be published automatically, so that it can be discovered by consumers.
When an API is modelled in the Solution Designer, a REST API will automatically be offered by the service. The REST API is secure by default and only allows access when a valid JWT is provided.
The implementation of the REST API can be done comfortably after cloning the project. Depending on the modelled operations, requests and responses, various code artefacts will be generated to ease the implementation. Using this code artefacts, ensures that the implementation is compliant with the API specification provided for potential consumers. To find out more about implementation of REST APIs, please check out Implement REST APIs (Java) or Implement REST APIs (TypeScript)
To easily visualize and access the REST API, please check out the Swagger UI Support Extension
Overview
The API building format used is closely related to the OpenAPI specification for REST APIs.
The user can define various endpoints (paths) for a REST API, operations (GET, POST, PUT, DELETE) for each of these endpoints, as well as the operation parameters, request bodies, responses, and contained schemas of various types. In general, it holds all necessary information to describe an API using OpenAPI for external consumers.
The API Version is used to manage the changes of the API. The older implementation of IBM DevOps Solution Workbench (versions 2.9 and prior) had the default API Version as 1.0.0 which is now configurable by the user. This will help the consumers of the REST APIs be aware of the changes. There is no change in the url of the REST APIs. For any kind of breaking changes in the contract, not only the API Version should have a major change (e.g., 1.2.0 to 2.0.0) but a new API Namespace representing a different API should also be created so the consumers of the APIs have the flexibility of upgrading to the latest APIs only if they are ready.
IBM DevOps Solution Workbench lets you create one or more separate REST APIs within a single service project. Each REST API is represented by its own API Namespace in Solution Designer and has its own API specification.
Create an API Namespace
To create an API Namespace, use the Create capability in the left navigation bar.
This process is separated into the following 3 steps where you have to provide different information:
- General Information: Internal information on the API Namespace
- API Information: Public information on the API
- Build Information: API integration settings
General Information
An API Namespace is defined by the following master data which will only be used internally:
- Prefix: The prefix of the API Namespace (must be unique within a project). Please note that only the characters a-z (without special characters) and digits can be used within a prefix. Furthermore, prefixes may not begin with a digit and the first character must be lowercase. A prefix can not consist more than 6 characters. This field is mandatory.
- Label: This is a meaningful title of the API Namespace. This field is mandatory.
- Description: This is the description of the API Namespace and its life cycle. This field is optional.
At this point, you have to choose, whether you want to create an API from scratch or create an API Namespace based on an existing API specification.
Create an API from scratch
After selecting and confirming the from scratch option you have to provide the following information about the API:
- API information for the resulting API specification file
- Build information regarding integrations like
- IBM Business Automation Workflow
- IBM API Connect
API information
The API information is the public information for this API and will be visible in the API specification file.
- API Title: Title of the API (mandatory)
- API Description: Description of the API (optional)
- API Version: Version of the API. The API Version is used to transparently manage the changes in the API. It helps to communicate the changes with the consumers. It will be reflected in the swagger of the API. It follows Semantic Versioning 2.0.0. (mandatory)
- Host: Base URL for API calls. The host of the server is only a placeholder and will be substituted depending on the deployment. The base path is pre-filled with the prefix of the API Namespace (mandatory)
- Contact E-mail: Contact E-mail of the API. A valid E-mail must be provided (optional)
- Contact Name: Contact name of the API (optional)
- Contact URL: Contact URL of the API (optional)
- License Name: License name of the API (optional)
- License URL: License URL of the API. A valid URL must be provided (optional)
- Terms of Service URL: Terms of service URL of the API. A valid URL must be provided (optional)
Build information
By proceeding with Next you can select the format for the API specification (OpenApi 3.0 or Swagger 2.0) that will be generated. Based on the selected format you have some options for integrations with this API.
IBM Business Automation Workflow (deprecated)
If selected, it will add additional integration artifacts that are automatically produced during the build process of the project. This means, you will be able to download a toolkit file via Solution Envoy which you can then import into IBM Business Automation Workflow.
IBM Business Automation Workflow can only be enabled when Swagger 2.0 is selected.
The toolkit will contain the following functionality:
- For each API operation of the API namespace, a service flow item is existing using the operationId as a name
- The service flow provides functionality to invoke the Rest call against the API Operation
- Parameters and Request body of the API operations are provided as input variables
- Responses of the API operations are provided as output variable
Additionally, the following input variables are available for the service flow:
- requestTimeout (Integer): The time in milliseconds to wait until the request will timeout. If not set, the default timeout from the server will be applied.
- responseTimeout (Integer): The time in milliseconds to wait until the response will timeout. If not set, the default timeout from the server will be applied.
After importing the toolkit, you can make use of the provided service flows in other toolkits or process applications.
To do this, it is necessary to provide some configuration for the connection to the Rest API, defined by the following environment variables:
- projectAcronym_apiNamespace_ENDPOINT_ADDRESS (e.g. ORDERS_ORDERAPI_ENDPOINT_ADDRESS): Provide the full URL of the deployed API in the service against which the Rest calls should be invoked (e.g. https://my-url/orders/api/orderapi)
- projectAcronym_apiNamespace_SSL_CONFIGURATION (e.g. ORDERS_ORDERAPI_SSL_CONFIGURATION) optional: The name of the SSL configuration to use.If not set, the default configuration from the server will be applied.
You can also modify the toolkit after importing it. Please consider that in this case, your changes will be overwritten by an import of any new version of the toolkit.
IBM API Connect
IBM API Connect can be enabled for both OpenApi 3.0 and Swagger 2.0. Once you enable this feature, some metadata about the API has to be provided.
- IBM Name: The display name within IBM API Connect (x-ibm-name) (mandatory)
- Phase: The phase of development the API is in. It can only take one of the following values (mandatory):
- identified
- specified
- realized
- Type: Type of the API. Currently, only rest (optional) is supported
- testable: Used to specify whether the API can be tested using the test tool in the Developer Portal. By default, it is disabled. (mandatory)
- enforced: Used to specify if the API Connect gateway is used to enforce the API. By default, it is disabled. (mandatory)
- cors: Used to specify whether CORS access control is used for the API. By default, it is disabled. (mandatory)
- Additional configuration: The mandatory API Connect configurations are reflected as YAML here. All non-mandatory API Connect configurations can be added here. For more information on the configurations, please refer to the IBM API Connect documentation (optional)
Clicking on Create after that will persist the new API Namespace. You can also use the Open after creation checkbox to open the API Namespace for further editing after creating.
Create an API Namespace based on an existing API specification
When selecting the based on uploaded Open API / Swagger file option you have to provide an API specification (.yaml or .json) file and upload it. After confirming with Create the uploaded file is first checked to be a valid specification. If it's content is invalid a message is shown within the dialog.
Currently, any compliant OpenAPI 3 specification can be used for the creation of a new API Namespace. However, the Solution Designer doesn't support the modelling of all OpenAPI 3 features through the UI. If you have special use cases in your API specification, warnings will be shown after creating the API Namespace. You can view and access them through the Expert view in the API Namespace.
Even though not all features are supported in the UI, the API of the deployed service will try to apply the valid OpenAPI 3 features correctly. Please find the list of API validations here.
If the uploaded API specification does not meet the above-mentioned expectations completely a list of notifications is shown in order to indicate what should be changed within the specification file to meet the expectations.
OpenAPI 3 specs allow parameters to be directly attached to a path so that they are shared to all of the path's operations, however while importing path pararmeters they're transferred into all of the operations and no longer saved within the path itself.
During the import IBM DevOps Solution Workbench auto-resolves the following issues if occurring to fit to the supported structure of the design environment:
- Component Identifier of every component is required to be capitalized and will be auto resolved to be capitalized
- Property Name is required to start with a lowercase letter and will be auto resolved
- content type application/json; charset=utf-8 is auto-solved to application/json
- Path URL is required to start with a "/" which is automatically added during import
- Path URL must not end with a "/" which is automatically removed during import
The information API Title, API Description, Host, Contact E-mail, Contact Name, Contact URL, License Name, License URL and Terms of Service URL will be taken from the uploaded API specification and can be changed afterwards. After successful creation of the API Namespace, a confirmation is shown and the created elements of the API namespaces are stated.
You can also use the Open after creation checkbox to open the API Namespace for further editing after creating.
Edit an API Namespace
Visit the API Namespace's overview page and then open General tab.
Edit the master data
By navigating to the API Namespace Details section on the right and using the Edit namespace details button, you can adjust Prefix, Label and Description. You can confirm your entry by using the Save capability.
Edit API information
On the second section on the right with the heading API Information, click the Edit API Information button.
You can only edit the following fields:
- API Title: Title of the API (mandatory)
- API Description: Description of the API (optional)
- API Version: Version of the API. The API Version is used to transparently manage the changes in the API. It helps to communicate the changes with the consumers. It will be reflected in the swagger of the API. It follows Semantic Versioning 2.0.0. (mandatory)
- Host: Base URL for API calls. The host of the server is only a placeholder and will be substituted depending on the deployment. The base path is pre-filled with the prefix of the API Namespace (optional)
- Contact E-mail: Contact E-mail of the API. A valid E-mail must be provided (optional)
- Contact Name: Contact name of the API (optional)
- Contact URL: Contact URL of the API (optional)
- License URL: License URL of the API. A valid URL must be provided (optional)
- Terms of Service URL: Terms of service URL of the API. A valid URL must be provided (optional)
You are not allowed to change the Host.
Edit build information
On the second section on the right with the heading Build Information, click the Edit build information button, you can adjust the Supported API Specification and the additional API Integrations. The edit options for IBM API Connect will be the same as enabling IBM API Connect while creating an API Namespace (see also). You can confirm your entry by using the Save capability.
Delete an API Namespace
To delete an API Namespace, use the Delete namespace button in the upper right corner of an API Namespace's overview page.
You will be asked to confirm the action before the selected command is permanently deleted. You can only delete a namespace if artifacts that belong to the namespace are not in use.
Excursion: When to release a new API?
A version number tag indicates a certain level of backwards-compatibility that can be expected by the client, and as such, extra care should be taken to maintain this trust. The following lists show which types of changes necessitate a new version, and which don't (1):
Changes that don't require a new version:
- New resources (under a new resource path)
- New HTTP methods on existing resources (new commands)
- New data formats
- New attributes or elements on existing data types
Changes that require a new version:
- Removed or renamed URIs
- Different data returned for same URI
- Removal of support for HTTP methods on existing URIs
Paths
A path describes the endpoint of an API for which several operations can be defined. Paths are relative to the base URL of the API, thus they will be placed directly after the server URL and may be followed by path parameters.
Paths always start with a slash /. Curly brackets { } mark parts of the URL as path parameters (
see parameters). API clients need to provide appropriate parameter values when making an API
call.
Example:
Here you can see a very basic example of a path and a path parameter.
/user/{id}
Each path can have up to four different operations: POST, GET, PUT, and DELETE. The combination of path and operation is unique within the API. Every operation type can only be created once for a specific path, i.e. one single path can be used for multiple operations, but it is not possible to create two operations of the same type for one and the same path.
Operations consist of at least one path, one operation id, and one response for successful execution. Additionally, they can contain tags, a summary, a description, parameters, additional responses, and, in the case of POST or PUT operations, a request body.
Create a path
You can crate a path by using the Create path capability on the paths overview page. A path must begin with a slash, but trailing slashes are not
allowed. Path parameters are wrapped around curly brackets { } and the name contained within in them defines the name
of the parameter. Query parameters are not represented in the path, but they are modelled separately in each operation.
After creation, a click on the path opens the path instance providing further information and the possibility to create, edit and delete operations. You can see which operations have already been created for a specific path in the paths overview as well.
Edit a path
You can edit a path by using the inline Edit capability in the paths overview and the Edit path button on its instance page.
Delete a path
You can delete the path by using the inline Delete capability in the paths overview and the Delete path button on its instance page. You will need to confirm the action before the selected path is permanently deleted.
Please be aware that all operations associated to the path will also be deleted with this action.
Operations
Create operations
After you created a path, go to the path's instance page by clicking on the link in the table. There, you can create one or more operation(s) by clicking on the Add operation tab (POST, GET, PUT, DELETE). You can view a specific operation's information by clicking on the corresponding tab on the path instance page as well.
Operations are defined using the following master data:
- Operation: The HTTP method and path of the operation. Only the HTTP method can be selected.
- Operation Id: This is the name of the operation. It is unique within an API Namespace. The operation ID is case-sensitive. Please note, that only the characters A-z (without special characters), digits and the special characters "_" and "-" are allowed for naming operations. It is recommended to follow common naming conventions (required)
- Tags: This is used for documentation purposes. It represents the logical grouping of the operations, for example, by resource. An operation can have none or more tags (optional)
- Summary: This is a short description of the operation (optional)
- Description: This is used to give a more elaborate description of the operation (optional)
If your project is based on Java Spring Boot Stack 2.0 and the extension Saga Pattern Support is enabled, each operation can be marked as a Saga Participant while creating. When doing this, the header "Long-Running-Action" is automatically added to the operation. This header then gets filled with the lra-Id when executing the API operation during a Saga in order to correlate Saga participants across multiple services.
Edit operations
You can edit the master data of a operation by clicking the Edit operation details button in the Operation Details section within the corresponding tab on the paths's instance page. The fields that can be edited are Operation Id, Tags, Summary and Description.
Furthermore, it is also possible to set the deprecated flag which will automatically deprecate your operation.
For Domain Service Projects of type Java Spring Boot where the extension Saga Pattern Support is enabled the flag Saga Particpant can be edited.
Delete operations
You can delete an operation by clicking the Delete operation button within the corresponding tab on the path instance page.
You will need to confirm the action before the selected command is permanently deleted.
Managing parameters of operations
It is possible to add a parameter to an operation in the Parameters section by using the Add capability. This can be either an inline parameter or a referenced parameter. When choosing Add inline parameter a new parameter will be created from scratch with referring to an existing or new, reusable schema. If you choose to Add referenced parameter you can select an existing parameter from the list.
Inline parameters
Inline parameters are defined using the following master data:
- Name: This is the name of the parameter. The name of a path parameter must be identical to the parameter defined in the path (required)
- Location: This flag shows whether the parameter is located in the path, the query or the header of a request ( required)
- Schema: This is a list of the primitive schema types that have already been created. The chosen schema will be applied to the parameter that has being created. A new schema can be created while typing in the drop-down and choosing Add (required)
- Required: This is a Boolean. If it is checked, then the property is required, otherwise it is optional (optional)
- Title: The title of the parameter (optional)
- Format: There you can select a pre-defined string format (optional)
- Pattern: The pattern is used for validation within any modifying action by defining a regular expression ( optional)
- Minimum Length: Set the minimum length the string must have (optional)
- Maximum Length: Set the maximum length the string must have (optional)
- Description: A brief overview on what this parameter should represent (optional)
- Enumeration Elements: You can specify a list of valid values for the parameter (optional)
Referenced parameters
Referenced parameters are a list of all parameters that have already been created and are visible on the Parameters tab. You can choose one or more and add them to a specific operation.
Managing request bodies of operations
Not possible for GET and DELETE!
It is possible to add a request body on the operation's instance page in the Request Body section by using the Add capability. You can either Add inline request body or Add referenced request body.
Inline request bodies
An inline request body is defined by using the following master data:
- Required: This is a Boolean. If it is checked then the property is required, otherwise it is optional (optional)
- Content-Type: There is only one type of content representation: application/json (required)
- Schema: A list of all schema types that have already been created. The chosen schema will be applied to the request body that's being created (required)
- Description: This is used to give a longer description of the request body (optional)
Referenced request bodies
Referenced request bodies are a list of all the request bodies that have already been created and are visible on the Request Bodies tab. You can choose one referenced request body and add it to a specific operation.
Managing responses of operations
It is possible to add a response on the operation's instance page in the Responses section by using the Add capability. Similar to the Request Body you can either choose to Add inline response or Add referenced response. Added responses of the operation can be edited or deleted by using the inline actions Edit or Remove of the table.
There must be at least one response for each operation!
Inline responses
An inline response is defined by using the following master data:
- Status Code: This is a number represents the response status code, should be a valid status code number and unique in the responses list (required)
- Content-Type: There is only one type of content representation: application/json (optional), and (required) if Schema is defined.
- Schema: A list of all schema types that have already been created. The chosen schema will be applied to the response that's being created (optional), and (required) if Content-Type is defined.
- Description: This is used to give a longer description of the response (required)
Referenced responses
Referenced responses are a list of all the responses that have already been created and are visible on the Responses tab. You can choose one, assign a status to it and add it to a specific operation.
Edit an operation's documentation
The documentation is used to provide further information regarding the implementation of the operation. There are three sections used to organize the documentation: the pre-condition(s), the operation logic/flow and the post-condition(s).
Schemas
A schema represents a data type that can be used by other components. Schemas can be of primitive or complex type.
Create a schema
You can create a new (reusable) schema by using the Create schema capability on the Schemas tab of the API Namespace's Overview page.
You must provide the following information for every schema:
- Type: Defines the type of the schema to be created (required)
- Local Identifier: Identifier of the schema. This value must be unique within the namespace and cannot be changed afterwards. Please note, that only the characters A-z (without special characters), digits and the special character "_" are permitted for naming fields! Furthermore, identifiers may not begin with a digit (required)
- Title: Title of the schema (optional)
- Description: Description of the schema (optional)
Schema types
The following types are available:
| Name | Type | Remark |
|---|---|---|
| String | Primitive | Text field for short, un-formatted texts. While creating, it is also possible to set enumeration elements |
| Boolean | Primitive | Type definition for truth values with the "true" or "false" property |
| Number | Primitive | Allows you to save a number with decimal places. While creating, it is also possible to set enumeration elements |
| Integer | Primitive | Allows you to save a number without decimal places. While creating, it is also possible to set enumeration elements |
| Object | Complex | Allows you to create an object with more than one property that are all of different types |
| Array | Complex | Allows you to create an array of items of an existing or new schema |
| OneOf | Complex | Allows you to create a type that could take the form of exactly one schema out of a list of predefined sub schemas |
Defining type specific behavior
While creating a schema you can define additional properties based on the type of the schema:
Boolean, Object
No specific information.
String
| Name | Type | Remark |
|---|---|---|
| Format | Selection List | date, date-time, email, password, url |
| Pattern | String | This pattern is used for validation within any modifying action by defining a regular expression |
| Min. length | Integer | |
| Max. length | Integer |
Number
| Name | Type | Remark |
|---|---|---|
| Format | Selection List | double, float |
| Min. value | Number | Defines the smallest valid value (minimum value) for a numeric property |
| Max. value | Number | Defines the largest valid value (maximum value) for a numeric property. If filled, it must be bigger or equal than the Min. value |
Integer
| Name | Type | Remark |
|---|---|---|
| Format | Selection List | int32, int64 |
| Min. value | Number | Defines the smallest valid value (minimum value) for a numeric property |
| Max. value | Number | Defines the largest valid value (maximum value) for a numeric property. If filled, it must be bigger or equal than the Min. value |
Array
| Name | Type | Remark |
|---|---|---|
| Array items | Selection List | Shows a list of all existing (reusable) schemas that can be used as items in that array schema. This information is mandatory |
OneOf
| Name | Type | Remark |
|---|---|---|
| OneOfSchemas | List | Define a list of sub schemas Minimum one object schemas has to be chosen. This information is mandatory |
| Discriminator | Discriminators are property names used to distinguish between the sub schemas of the oneOf schema. When defining a property name as discriminator, The discriminator name must be unique within an object. The discriminator has to start with a lower case letter and can contain letters, numbers or underscores. This information is mandatory |
Edit a schema
You can edit all types of (reusable) schemas by clicking the Edit schema details button in the Schema Details section on the schema's instance page. Alternatively, you can use the Edit capability of each table row on the Schemas tab of a api namespace's Overview page.
Within these actions you can adjust all schema specific properties (see chapter before) except of the type of schema and its local identifier.
For some schema types there is additional information to maintain described as the following:
Managing a String schema
You can add and edit enumeration elements to a string by using the inline Information capability and navigating to the Enumeration Elements section and using the Add or Edit capability. The only property needed to add an enumeration element is the key of the new enumeration element.
Please note that the key of an enumeration element must not contain any spaces. Additionally, underscores at the beginning of a enumeration element key are not allowed for API schemas within projects of the Java Spring Boot stack.
You can remove an enumeration element by using the inline or overhead Remove capability.
Managing an Object schema
Properties can be added, edited and removed only in object schemas.
There are two options when adding a property: Import or Add properties.
Import properties
You can import properties of entities that you already created in a Domain Namespace or in an Integration Namespace.
If you want to import properties from an existing entity you have to select the entity first. The import dialog provides a drop-down with all available entities. After selection, you will be presented with a table that lists all available properties. In case the selected entity has no properties at all, you will see a hint.
Now you can select one or more properties which will get added to your schema after clicking on the Import button of the dialog.
You also have the option to edit a property's name and set it as a required property.
Mapping rules when importing properties:
| Domain Namespace Property | Is a List | Property to create | Schema Type |
|---|---|---|---|
| Reference | false | referenced schema property | mapped to an existing or new reusable schema |
| Reference | true | inline property of type array | mapped to an existing or new reusable array of object schema |
| External Reference | false | referenced schema property | mapped to an existing or new reusable schema |
| External Reference | true | inline property of type array | mapped to an existing or new reusable array of object schema |
| Local Entity | false | referenced schema property | mapped to an existing or new reusable object schema |
| Local Entity | true | inline property of type array mapped to an existing or new reusable array of objects schema | |
| Currency | - | referenced schema property | mapped to an existing or new reusable schema |
| GeoPoint | - | referenced schema property | mapped to an existing or new reusable schema |
| Text | - | inline property | primitive type String |
| Text/Email | - | inline property | primitive type String |
| Text/URL | - | inline property | primitive type String |
| Boolean | - | inline property | primitive type Boolean |
| Date | - | inline property | primitive type String |
| Time | - | inline property | primitive type String |
| Timestamp | - | inline property | primitive type String |
| Selection Element | - | inline property | primitive type String |
| Localized Text | - | referenced schema property | mapped to an existing or new reusable schema |
| Decimal | - | inline property | primitive type Number |
| Integer | - | inline property | primitive type Integer |
| Long | - | inline property | primitive type Integer (format: int64) |
Add properties
Inline are the properties that are created from scratch with a new schema definition that has not been created before. After the creation of an inline property, the newly created property will not be reusable.
Inline properties are defined using the following master data:
- Name: This is the name of the inline property. It is unique within a namespace. Please note, that only the characters A-z (without special characters), digits and the special character "_" are permitted for naming inline entities! Furthermore, names may not begin with a digit and the first character must be in lower case. The identifier can not be changed after creation (required)
- Property Type: This is the schema type of the property that is being created. It can be one of the primitive types (String, Boolean, Number, Integer), an Array, a OneOf or it can reference an existing schema that was previously created (required)
- Required: This is a Boolean. If it is checked, then the property is required, otherwise it is optional (optional)
The rest of the properties depend on the type of the chosen schema.
You can use properties and select an existing schema if you want to nest schemas into each other
Delete a schema
You can delete a schema by clicking the Delete schema button in the upper right corner of the schema instance page. Alternatively, you can use the Delete capability of each table row on the Schemas tab of a api namespace's Overview page.
You will need to confirm the action before the selected schema is permanently deleted.
You can only delete a schema if it is not in use.
Parameters
Parameters are defined either as header, query or path parameters. You can create a new parameter by using the Create capability in the Parameters tab of a Domain Namespace's Overview page.
Create parameters
A parameter can be created by using the Create parameter capability.
They are defined by using the following master data:
- Identifier: This is the identifier of the parameter. It is unique within a namespace. Please note, that only the characters A-z (without special characters), digits and the special characters "-" and "_" are allowed for naming parameters! Furthermore, names may not begin with a digit and the first character must be lowercase. The identifier cannot be changed after creation (required)
- Name: This is the name of the parameter. The name of a path parameter must be identical to the parameter as defined in the path (required)
- Location: This flag shows whether the parameter is located in the path, the query or the header of a request ( required)
- Parameter Type: Either choose a primitive type to directly create an inline schema parameter or choose one from the list of the primitive schema types that have already been created (required)
- Description: This is used to give a longer description of the error that occurred (optional)
In case of creating a parameter with an inline schema you have to specify additional information for that schema and in case of String, Number or Integer also the enumeration elements (if needed).
The following header parameters should not be modelled to avoid duplicate issues because they are added automatically during the build pipeline's run: Accept-Language, X-B3-ParentSpanId, X-B3-SpanId, X-B3-TraceId, X-B3-Sampled and X-DEBUG-SESSION. If Location is path, dots or dashes are not allowed in name. If a name was created by an uploading API containing dashes or dots, you will see a warning in the Problems section.
Edit parameters
You can edit the master data of a parameter by clicking the Edit parameter details button in the Parameter Details section on the parameter's instance page. Alternatively, you can use the Edit capability of each table row on the Parameters tab of a api namespace's Overview page. The fields that can be edited are Name, Location, Schema and Description.
In case of editing a parameter with an inline schema you can access additional information for that schema and in case of String, Number or Integer also the enumeration elements (if needed).
Delete parameters
You can delete a parameter by clicking the Delete parameter button in the upper right corner of the parameter instance page. Alternatively, you can use the Delete capability of each table row on the Parameters tab of a api namespace's Overview page.
You will need to confirm the action before the selected parameter is permanently deleted.
You can only delete a parameter if it is not in use.
Request bodies
Request bodies are typically used with create and update operations (POST, PUT). For example, when creating a resource using POST or PUT, the request body usually contains the representation of the resource to be created. Consequently, each operation can only have one single request body.
At the moment, only application/json can be specified as content type.
Create a request body
A request body can be created in the Request Bodies tab by using the Create request body capability.
The request body is defined by using the following master data:
- Identifier: This is the identifier (name) of the request body. It is unique within a namespace. Please note that only the characters A-z (without special characters), digits and the special character "_" are permitted for naming request bodies! Furthermore, names may not begin with a digit and the first character must be uppercase. The identifier cannot be changed after creation.
- Required: This is a Boolean. If it is checked then the request body is required, otherwise it is optional
- Content Type: It is a selection element with only one choice: application/json. This field is mandatory only if a schema type has been selected
- Schema: This is a list of all the schema types that have already been created. The one chosen will be the schema type of the request body that s being created. Request bodies can only be of type Array/Object/OneOf (required)
- Description: This is used to give a longer description of the request body (optional)
Edit a request body
You can edit the master data of a request body by clicking the Edit request body details button in the Request Body Details section on the request body's instance page. Alternatively, you can use the Edit capability of each table row on the Request Bodies tab of a api namespace's Overview page. The fields that can be edited are the Required flag, Content Type, Schema and Description.
Delete a request body
You can delete a request body by clicking the Delete request body button in the upper right corner of the request body instance page. Alternatively, you can use the Delete capability of each table row on the Request Bodies tab of a api namespace's Overview page.
You will need to confirm the action before the selected request body is permanently deleted.
You can only delete a request body if it is not in use.
Responses
Every operation needs at least one response, but usually a success and an error response.
Create a response
A response can be created in the Responses tab of an API Namespace's Overview page by using the Create response capability.
Responses are defined using the following master data:
- Identifier: This is the identifier (name) of the response. It is unique within a namespace. Please note that only the characters A-z (without special characters), digits and the special character "_" are permitted for naming response! Furthermore, names may not begin with a digit and the first character must be uppercase. The identifier cannot be changed after creation.
- Required: This is a Boolean. If it is checked then the response is required, otherwise it is optional
- Content Type: It is a selection element with only one choice: application/json. This field is mandatory only if a schema type has been selected
- Schema: This is a list of all the schema types that have already been created. The one chosen will be the schema type of the response that s being created. responses can only be of type Array/Object/OneOf (required)
- Description: This is used to give a longer description of the response (optional)
Edit a response
You can edit the master data of a response by clicking the Edit response details button in the Response Details section on the response's instance page. Alternatively, you can use the Edit capability of each table row on the Responses tab of a api namespace's Overview page. The fields that can be edited are the Content Type, the Schema and the Description.
Delete a response
You can delete a response by clicking the Delete response button in the upper right corner of the response instance page. Alternatively, you can use the Delete capability of each table row on the Responses tab of a api namespace's Overview page.
You will need to confirm the action before the selected response is permanently deleted.
You can only delete a response if it is not in use.
Expert View
The Expert view displays the auto-generated OpenAPI 3 specification containing all of the components of the API Namespace, and it's a preview of how the generated specs will look like when committing the project to the git repository. The Expert view is accessed through the Expert view tab in the API Namespace.
For the deployed service, some additional data will be added to the API specification, e. g. the service url and security configuration.
Inspecting the API specification in the Expert view
Default parameters
When opening the Expert view, you can see that there are some parameters added to the API specification by default. Even though those parameters are not visible in the Solution Designer UI, they are applied automatically in any API operations.
Default parameters used in API operations:
paths:
  /pets:
    get:
      tags: []
      operationId: getPets
      parameters:
        - $ref: '#/components/parameters/Accept-Language'
        - $ref: '#/components/parameters/X-B3-ParentSpanId'
        - $ref: '#/components/parameters/X-B3-SpanId'
        - $ref: '#/components/parameters/X-B3-TraceId'
        - $ref: '#/components/parameters/X-B3-Sampled'
        - $ref: '#/components/parameters/X-DEBUG-SESSION'
Specific constants
At the bottom of the Expert view, there will be some constants that shouldn't be edited or removed as these are used internally by the Solution Designer. The values of these x-knowis constants will not change even if it is edited or removed.
x-knowis-solutionAcronym: TSLOWCODEAPI
x-knowis-apiName: pet
x-knowis-namespacePrefix: pet
x-knowis-ibmBpmIntegration: false
x-knowis-ibmApiConnectIntegration: false
x-knowis-language: typescript
x-knowis-supportedspec: openApi3.0
Editing the API Namespace through the Expert view
The API Namespace components can be edited in the Expert view by clicking the Edit API specification button.
By editing the API specification through the Expert view, the whole namespace will be adjusted automatically.
Be aware of a possible loss of documentation by using the Expert view. Please note that if you change the API specification via the expert mode, any existing documentation of the spec artifacts is discarded. Either use the modeling capabilities or make sure that you can preserve the documentation beforehand and apply it later again.
If you want to apply OpenApi 3 features to your REST API, which are not supported through the modelling capabilities in the Solution Designer UI, you can also use the editor in the Expert view to add those.
Even though not all features are supported in the UI, the API of the deployed service will try to apply all valid OpenAPI 3 features correctly. Please find the list of API validations below.
API validations
- General validations:
- no duplicated items (is valid in OpenApi 3.0/Swagger 2.0 with lower- and upper-cased)
- valid Contact E-mail
- valid Contact URL
- valid License URL
- valid Terms of Service URL
- Paths:
- must meet the general validation rules for paths
- Operations:
- must meet the general validation rules for operations
- only POST, GET, PUT and DELETE operations are directly supported by the Solution Designer, while PATCH, HEAD, OPTIONS, TRACE operations are only accessible through the Expert view.
- operations GET and DELETE are not supported to have a request body
- inline and referenced parameters are supported
- inline and referenced request bodies are supported
- inline and referenced responses are supported
- only one request body is supported per operation
- no duplicated status codes are allowed in responses
- Parameters:
- must meet the general validation rules for parameters
- for referenced parameters, schemas of type string, boolean, integer and number are allowed. For inline parameters primitive inline schemas are supported as well
- Parameters with generic object or array schemas are only accessible through the Expert view
- Parameter location can be either Path, Query or Header Note: header parameters named Accept, Content-Type and Authorization are not allowed.
- Parameters in cookie are only supported through the Expert view
- Request Bodies:
- must meet the general validation rules for request bodies
- only referenced Object and Array schemas are supported by the Solution Designer
- other schema types, and inline schemas are only accessible through the Expert view
- Responses:
- must meet the general validation rules for responses
- only referenced Object and Array schemas are supported by the Solution Designer
- other schema types, and inline schemas are only accessible through the Expert view
- application/json and application/json; charset=utf-8 are supported by Solution Designer, other content types are only accessible through the Expert view
- Schemas:
- must meet the general validation rules for schemas
- Solution Designer supports only referenced schemas as array items
- Solution Designer supports only referenced object schemas as AllOf schemas
- Solution Designer does not support inline object schemas as schema properties
- Solution Designer supports only referenced object schemas as OneOf schemas and discriminator is required here
- All of the other compliant OpenAPI 3 features are only accessible through the Expert view
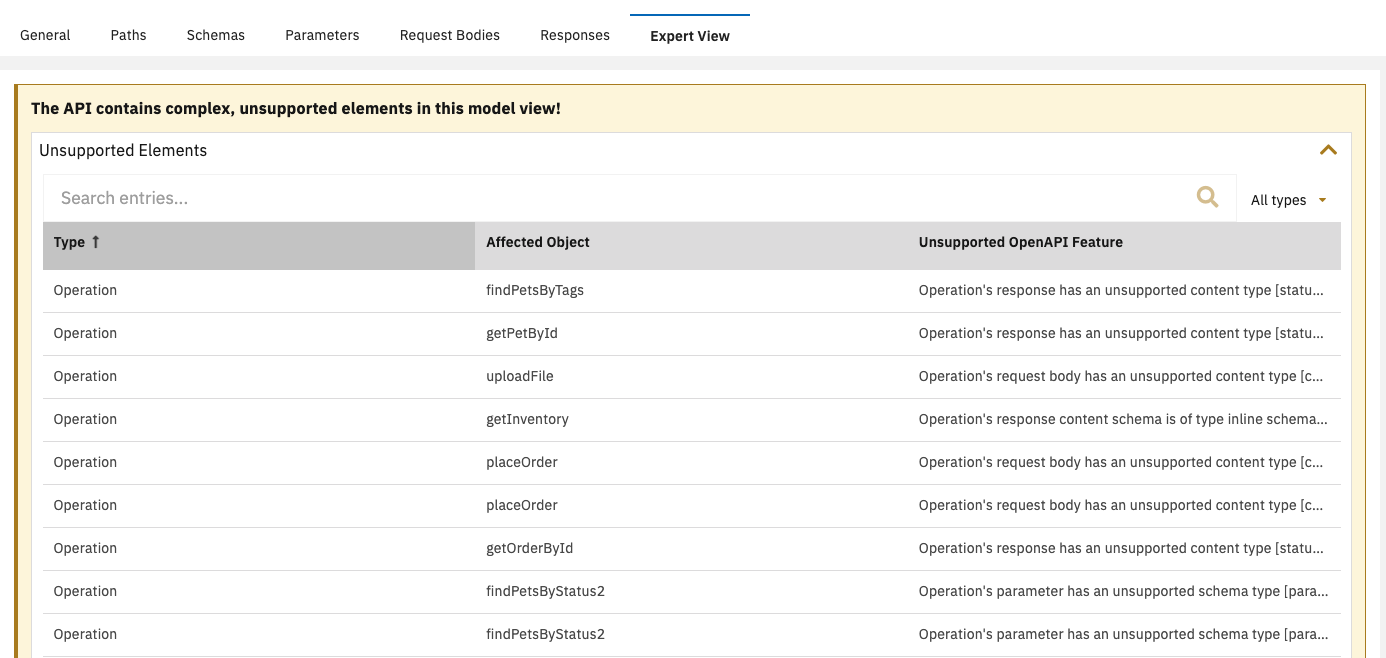
In case that the API Namespace contains any OpenAPI 3 feature which is not supported by the Solution Designer UI, the Expert view will show detailed information about the unsupported OpenAPI 3 features.
Visualize modelled elements in markdown
You can easily create plantUML diagrams by either inserting native plantUML syntax in a codeblock or auto-generate a
diagram by clicking on the "Insert diagram" button or using the k5 command.
For all kinds of diagrams the placeholder, ns has to be replaced with the name of the namespace that holds the object
for which the diagram should be generated.
Operations
operation ns:OperationId request response all
Replace OperationId with the name of the operation you want to generate a diagram for.
Options:
request: Shows the request (incl. parameter + request bodies).response: Shows the responses.all: Shows request and responses.
By using the command without any extension the default is to show the operation with its request and responses.